Semi-Automatic Focus Stacking on Sony Cameras
With today’s high resolution cameras, focus stacking is pretty much a necessity to get the maximum detail out of the sensor. Even with wide angle lenses, it is hard to get enough DOF to cover the foreground to the background and have everything sharp when viewed at 100% magnification. You could stop down to increase the DOF but this actually doesn’t work well with high megapixel sensors as exceeding even f/8 can result in a loss of resolution due to diffraction. This impact is extremely noticable once your sensor is in the 40 MP range or higher.
To help address this, most camera manufacturers include an automatic focusing stacking mode. You tell the camera the closest and furthest points you want to be sharp and it automatically takes a series of pictures gradually changing the focus distance between them. The end result is a series of shots where everything from the foreground to the background is sharp in at least one image. You then stack or combine the images in post-processing with programs like Photoshop (my preference), Helicon Focus, or Zerene Stacker, etc. which results in a final image with sharp detail everywhere.
Unfortunately, Sony does not include this functionality in it’s cameras even though it’s a frequently asked for feature. Although you can focus stack manually by selecting different AF points for different parts of the scene, this is problematic because you are just guessing distances and depth of field – it’s possible to get gaps in coverage depending on how you choose the points and this has happened to me before.
Note: Since I’ve written this article, Sony has released the A7R V camera body which has built in focus bracketing. I expect that all future bodies from Sony will also have this feature. So the technique described in this article is no longer needed going forward, but can still be applied if you have an older body or you don’t want to use the automatic method.
However, there is now a close to automatic method for focus stacking using the Sony RMT-P1BT Wireless Remote Commander which costs about $80. Basically the remote lets you adjust focus by hitting the +/- buttons. And it moves the focus by an amount that takes into consideration the current focus distance and aperture. (Note the remote works with sony’s newer cameras including the a7r III and IV but not the a7r II.)
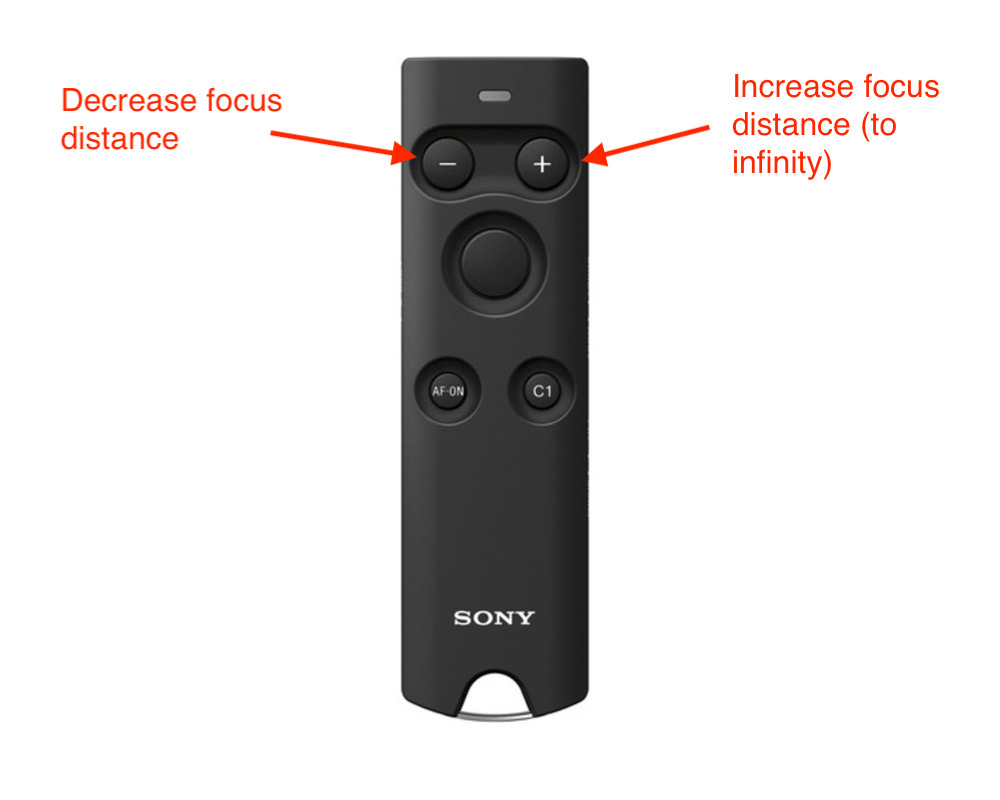 The Sony RMT-P1BT bluetooth remote allows control of focus by pressing the + or - buttons when in manual focus mode.
So here’s how you would use it for focus stacking in the field.
- Focus on the closest object in your scene that you want sharp (use either AF or MF)
- Put the camera into manual focus mode. If there is an AF/MF switch on the lens, keep it on AF.
- Take a picture
- Advance the focus by hitting the + button 1-3 times
- Goto step 3 until the distance indicator in the EVF/LCD shows that you have reached infinity
In step 4, I typically use 2 button presses. I found that three presses sometimes doesn’t result in enough overlap between areas of sharpness (on my Sony A7R4). However I think this is something that you should test with your camera.
Below is an example of a test scene.
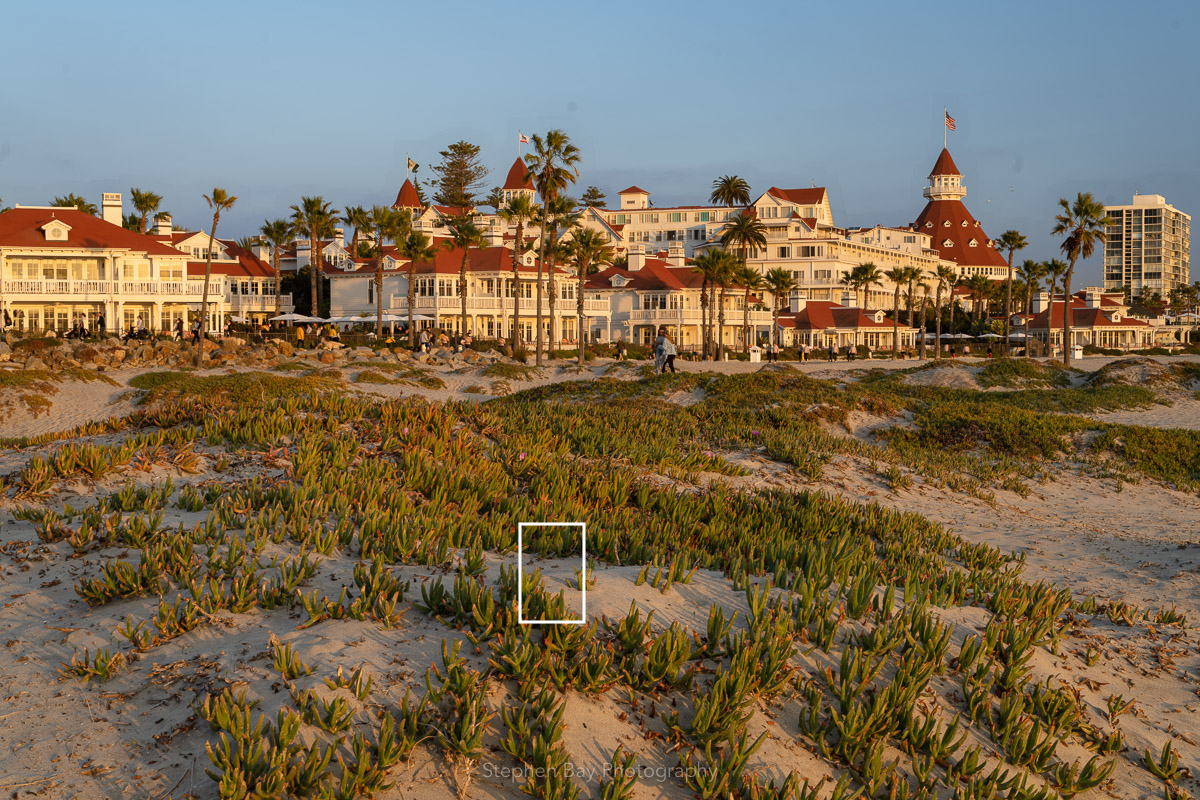 The full scene used for testing focus stacking. The white box represents the close-up in the next image.
 The transition zone between shots 3 & 4 in the focus stack series (2 button presses).
 Layer masks generated by the Photoshop focus stacking algorithms. Closest focus is at the bottom (image 103745).
Also note that a button press is a bit imprecise. Sony will rack the focus an amount depending on how long you keep the button pressed. A quick press and release may result in a slightly different adjustment each time, so you’ll have to test what works for you.
To test the consistency of the adjustments, I reshot the scene a few times. The following table shows the focus distance as returned in the exif data.
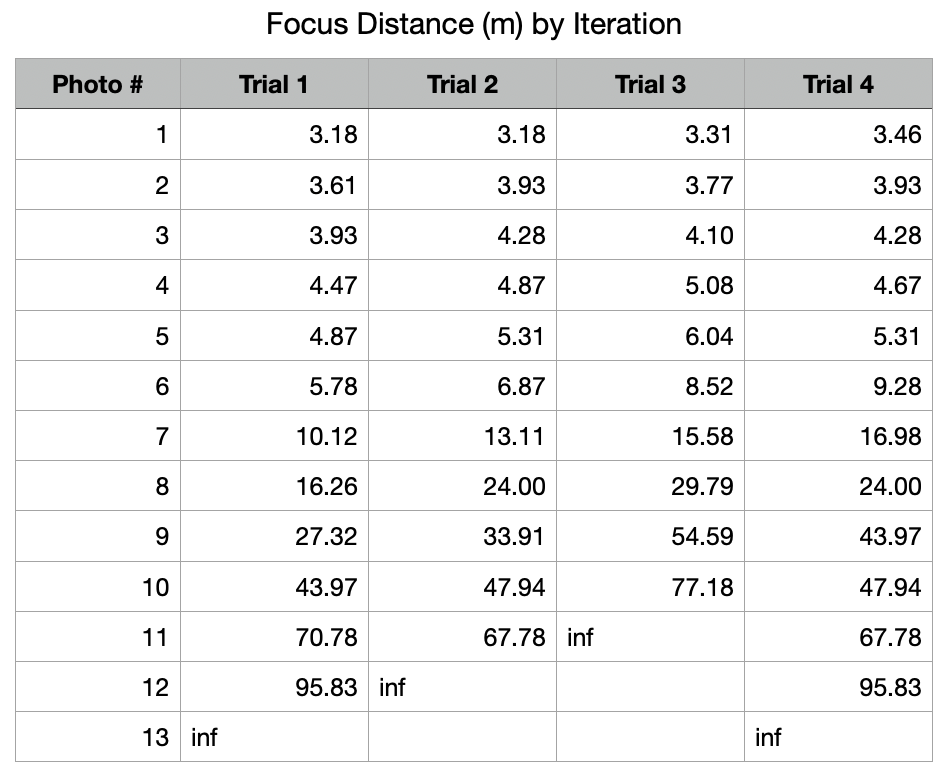 Consistency of the focus distance changes with each step in the stacking. This is with 2 button presses between photos. Distance is the reported focus distance in meters as reported by the EXIF data
You can see from the numbers that there’s quite a bit of variability in the steps. So to be safe, I would reshoot the scene a few times to make sure that I had the necessary base images for focus stacking. This is a good practice anyways, as it’s always possible for one shot in the series to be ruined by wind, camera shake, etc. You can delete the unused images later.
Overall, using the remote is fairly quick in the field, taking perhaps taking a minute or even less time to do a series of shots. However, I would really like to see Sony add focus-stacking as a built in function but until then I will use the remote (or do manual stacking).
 Another example using the Sony bluetooth remote. This is a focus stacked photo using seven base images with the focus distance varying from 1.02m to 5.66m (as recorded in the the EXIF data).