Blend If vs Luminosity Masks
Blend if and luminosity masks are two different methods in Photoshop for determining how a layer is combined with those beneath it. They are both similar in that they use the brightness values of the image pixels to perform a weighted average between the current and underlying layers.
Blend if and luminosity masks are almost interchangeable and can often be used to obtain the same end result. For example, you could use both methods to limit a warming color adjustment to the highlights of an image. In landscape photography, photographers regularly use luminosity masks to combine a light and dark exposure of a scene to obtain greater dynamic range (a.k.a exposure blending or HDR). However you can also achieve the same exposure blending by using the blend if layer functionality.
While the end result might be the same, there are some important differences which can impact your post-processing workflow. In this article, I’ll go over how blend if and luminosity masks are the same, how they are different, and why you might choose one method over the other. I’m going to assume that you are already familiar with these methods, but if not I suggest reading these articles on blend if and luminosity masks.
Ease of Use
Blend if is built into to PS and is very easy to use. Just double-click on a layer to open the layer style dialog box. You can set the blend if parameters based on either the underlying layer or the current layer. If you want to see visually what is being affected, you can use the color overlay option.
 The layer style dialog window which shows the blend if controls. Double click on the layer in the layers palette to access this window.
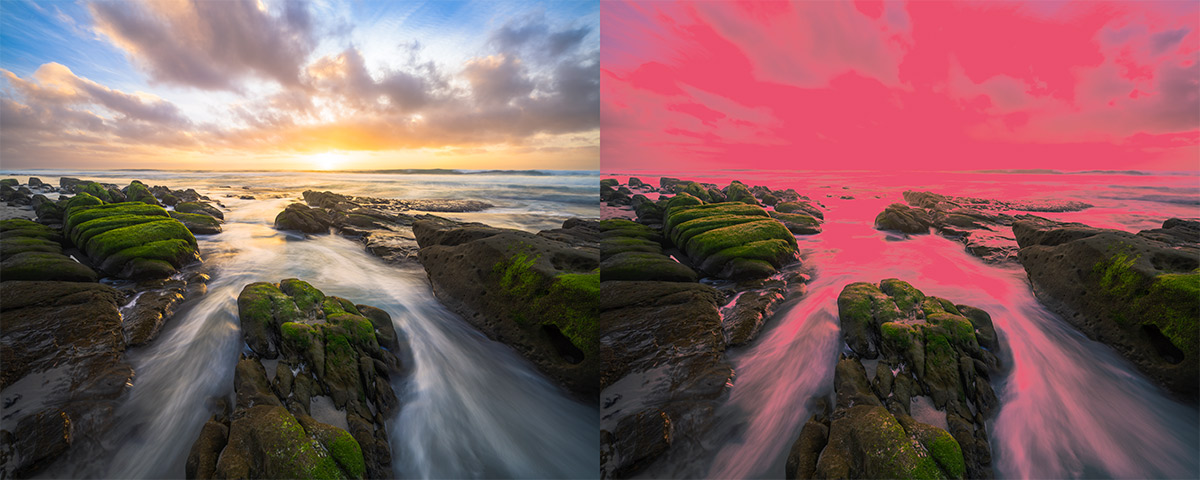 A color overlay makes it easy to visualize the regions impacted by blend if.
If you know the range of values that you’d like to impact, for example, say all the brighter tones, you can directly enter those numbers in the blend if panel and choose an appropriate feathering range. In the example above, blend if applies the impact of the current layer at 100% when the brightness is between 180 and 255. It applies a proportionally reduced amount when the brightness is between 48 and 180. Below 48 there is no impact.
In contrast, luminosity masks are not part of Photoshop’s basic functionality and need to be constructed either manually, with pre-recorded actions, or via a third party panel.
There are many ways to create a luminosity mask manually, but typically you would add, subtract, and intersect selections, or use the apply-image / image calculation functions on a channel. In general, manual construction is very tedious so most people either create their own actions to make luminosity masks or they use a third party panel such as TK Actions or Lumenzia to create the masks.

The TK7 (left) and Lumenzia (right) panels for creating luminosity masks.
I personally use the TK Actions panel but most panels operate in very similar fashion. As you can see from the screenshots, the panels are quite complicated and have many buttons representing the different ranges you may want to target with a luminosity mask.
With luminosity masks, you cannot specify the range of tones you want affected ahead of time because of the way they are constructed. Instead you cycle through a number of pre-defined masks until you find one that more or less covers the range you want. If you cannot find a mask with a good fit, you may need to add or subtract several different masks to get the desired coverage or you can modify an existing mask with an image adjustment (usually curves or levels).
Overall, I think blend if is considerably easier to use. There’s a simple built-in interface and it doesn’t require any additional actions or plug-ins. Specifying the range of tones you want to affect is straightforward.
Parametric vs Pixel Based Adjustments
Blend if is a parametric adjustment. By that I mean Photoshop records it in your image file as a set of instructions with numbers (the parameters) representing the starting and ending brightness values that you would like to impact. Then when Photoshop displays an image it applies the blend if rules on the fly. If you change the underlying layers, PS will recalculate the impact of blend if and automatically produce an updated image. You can also take adjustment layers with blend if and just copy them to a new image and have them work seamlessly. This is extremely helpful because I will often edit one image and then decide that I would like to apply those exact same edits to another image from that same shoot.
Blend if is also easy to adjust after it has been applied. For example, I may use the sliders to select a narrow range of tones say from 100-150. However, if I later decide that my initial range was too narrow, I can just move the sliders and broaden the range of tones to say 50-200 or whatever is desired.
Luminosity masks are pixel based just like all other masks in Photoshop. That means they are grayscale images and the value at each pixel determines how the layer is blended with those underneath. Once you create the mask, it stays fixed and doesn’t change even if you alter the image data underneath it.
For example, say I load an image into PS and do some clone stamping. I then start applying curves adjustments with luminosity masks. The layers palette now looks something like the following:

But I realize that I missed a dust spot and I need to go back to the clone stamp layer to remove it. This is easy enough to do but the luminosity masks in the higher layers are now out of sync with the underlying data. This can result in faint ghosts unless I regenerate the luminosity mask. Sometimes this can be a problem, especially if you don’t remember the exact settings that you used to create the mask. Similarly if I want to apply the exact same edits to a different image, the luminosity mask will not be matched and needs to be regenerated.
To some extent, you can make recreating or updating the luminosity mask easier by including the appropriate information in the layer name. E.g. I might call a layer “blue-2” to represent a lights-2 mask made on the blue channel. Obviously this is cumbersome and there’s no convenient way to record the necessary information if you applied a complex curves adjustment to the mask.
File Size
Blend if generally results in smaller files than luminosity masks even when they are used to make the exact same adjustment. To demonstrate, I took the following two images and loaded them into Photoshop. I then added 3 curves adjustment layers with either blend if or a corresponding luminosity mask impacting lights, darks, and midtones.


The table below shows the resulting image file sizes when stored as a 16-bit tif with zip compression. Both images were 7952x5304px or 42 megapixels.

The files using blend if are significantly smaller. This is because Photoshop only needs to store a few numbers (where the blending regions start) instead of an entire grayscale image representing the mask. The blend if files are also faster to save as Photoshop doesn’t need to compress the layer masks.
Channels
Blend if can only be applied to an image channel which depends on the image mode. Typically this would be RGB, but if your image was in CMYK you could apply it to the individual C, Y, M, or K channels. Similar if your image is in Lab color mode you could apply it to either the L, a, or b channels. However, one drawback is that you cannot choose a channel that is different from your image mode. If your image is in RGB, you cannot apply blend if based on CYMK or Lab.
Like blend if, luminosity masks can be created based on any of the image channels including RGB, CMYK, or Lab. However, luminosity masks have more flexibility and can be made based on any transformation or adjustment applied to the image as long as the result is B&W (or can be converted to B&W). That means luminosity masks can also be applied to arbitrary color ranges and even saturation or vibrance.
Furthermore, luminosity masks are not limited by the channels set by the image mode. You can mix masks based on different channels in the same image. For example, I could have masks based on the R channel from RGB, the Y channel from CMYK, and a third mask for saturation.
Adjusting Feathering
Both blend if and luminosity masks feather the effect in the current layer by having partial application depending on the pixel values. In blend if, it’s a linear scaling between the left and right split points. For example, lets go back to the blend if settings used in the first example:

Blend if will scale the impact linearly as the brightness varies from 48 to 180. Thus at the value 114 (midway between 48 and 180), blend if will apply the layer at exactly 50%. At the value 160, which is 85% of the way between 48 and 180, Blend if will apply the layer at 85% strength.
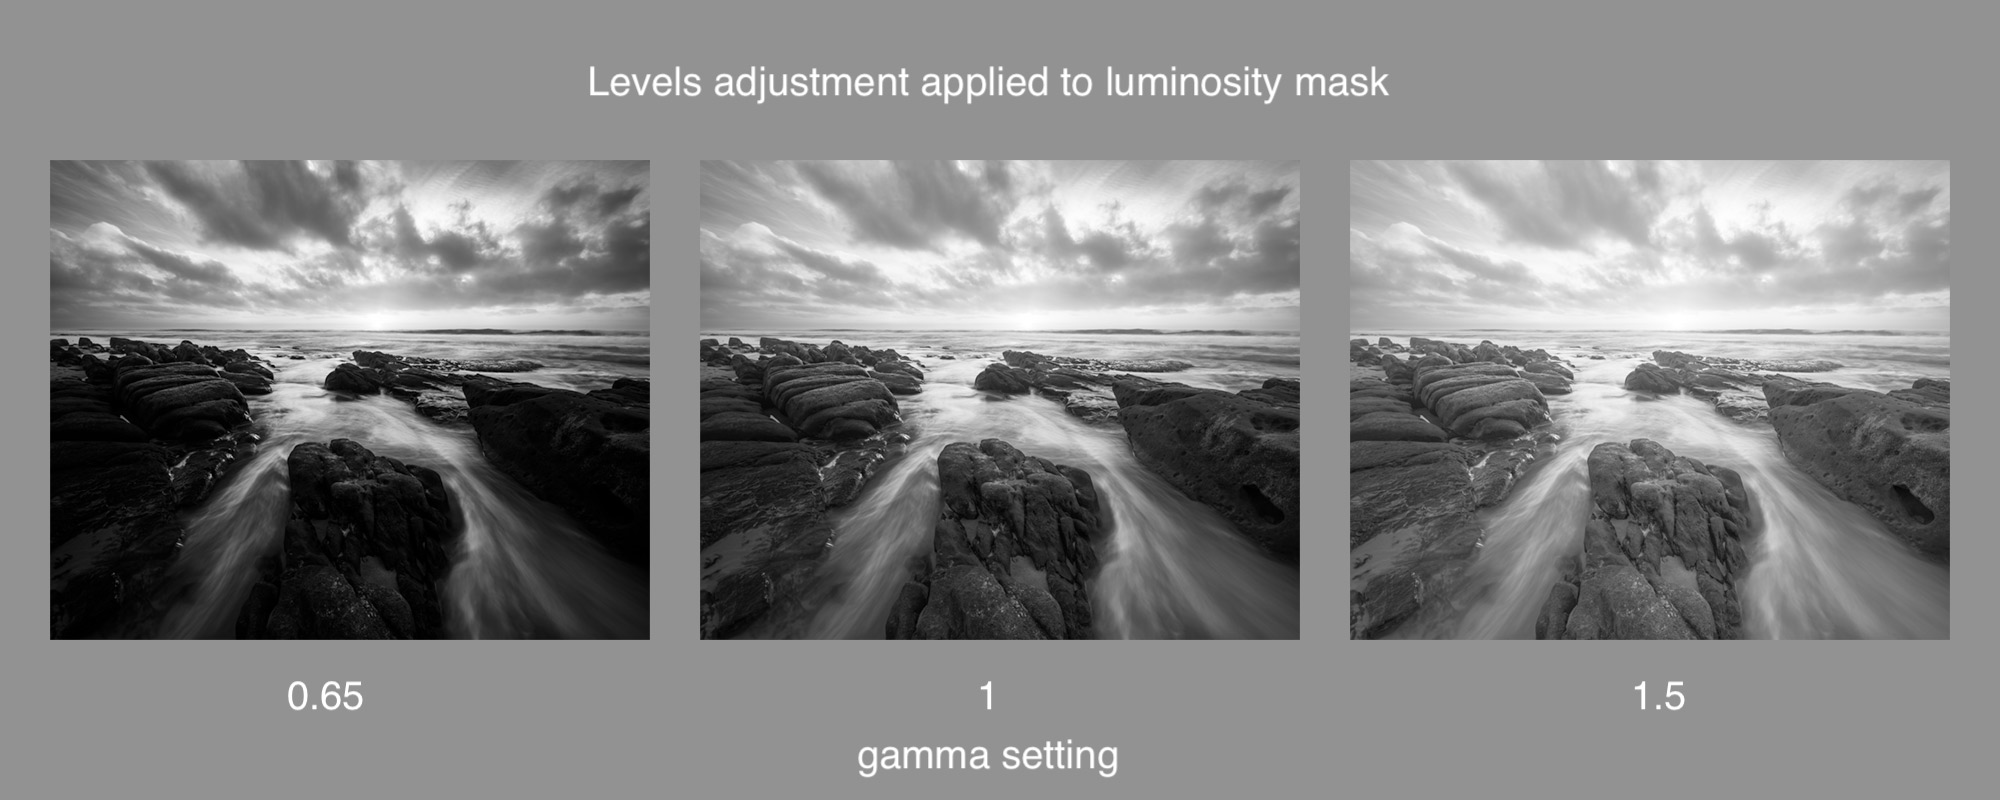
Luminosity masks are not restricted to this linear scaling. Because luminosity masks are images, one can apply any type of transformation to the mask including a curves or levels adjustment and the transition to 100% strength can be made to occur earlier or later in the feathering range. For example, the image below shows a luminosity mask (lights 1) with three different levels adjustments for gamma = 0.65, 1, and 1.5 (note gamma=1 is the baseline and results in no change). Blend if can exactly replicate the middle mask (gamma=1) but not the other two masks.
Conclusions
Blend if and luminosity masks have a large overlap in functionality and can often be used interchangeably to achieve various post-processing results.
In my own work, I prefer to use blend if whenever possible due for three main reasons. First, blend if is simple to use and lets me directly target the tones of interest. I don’t need a panel taking up valuable screen real estate. Second, the parametric nature makes it easy to make changes in a layer stack or to duplicate adjustments in other images. Finally, blend if often results in significantly smaller file sizes.
However there is more flexibility with luminosity masks. So if I cannot achieve my editing goals with blend if, I won’t hesitate to use luminosity masks. In many of my images I use both tools as the situation requires.